Pillar candles
The first time you light your candle, trim the wick to 1/4″. Burn the candle long enough until you have a good burn pool. Wax has a burn memory which means if you extinguish the candle too early it will effect future burns and possibly cause tunnelling.
Once you have the burn pool at its maximum burn radius, snuff the flame out rather than blow. It will keep the wick straight for future burns.
Remove any debris from the burn pool and hug the sides of the candle. (Please use extreme caution when hugging the top of the candle – Wax is hot and it will burn.)
For your next burn – re-trim the wick to 1/4″ before lighting
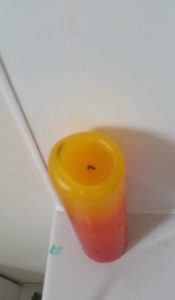
This candle was not left to burn for two hours. The burn pool had not reached its maximum potential. On the next burn the candle will tunnel even though the sides have been hugged!
It looks from the picture a friend sent over to me (yes it is one of my test candles that she fell in love with and took before I’d had a chance to do my test burns), but it looks like it was in a draft and did need a bigger wick.
There is a little soot around the top of this candle – Cause – the wick was not trimmed before the first light – The flame was too high causing soot and a large flame.
NOT TRIMMING THE WICK CORRECTLY
Not trimming the wick can cause a host of problems for the first burn and future burns – It will effect the burn times and will significantly reduce the life expectancy of your candle. Leaving the wick too long will cause:
Large flickering flame
Tunnelling
Black smoke coming from the wick –
This is not an exhaustive list, but it is just three examples for you to consider.
By the same theory cutting the wick too short can cause problems – mainly for the first burn. Cutting a wick too short will almost always result in the candle drowning in its own burn pool. Once a candle drowns there isn’t a lot that can be done to salvage the candle.
Novelty or irregular shaped candles
The main problem with novelty candles or irregular shaped ones is – a wick burns in a circle and not to the strange shapes some candles come in.
If your candle is slim at the top and then goes down to a thicker stem it creates two main problems –
1. How do you avoid dripping if you size the wick to the thinner top?
2. How do you get it to burn a thicker bottom?
There isn’t a solution for this problem – Most candle makers would rather a candle drips at the beginning of a burn and then let it settle down as it gets thicker. If we tackled the candle any other way and used a smaller wick – The candle would tunnel no matter what anyone did to the candle for future burns.
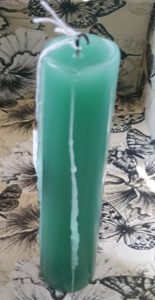
It isn’t easy to see in the picture as this is one of my test candles – But this candle is thinner at the top than the bottom.
Another example of a thinner top with a thicker bottom –
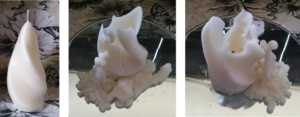
Wrong wick used
Problems – Tunnelling, cracking and dripping
Although this candle was wicked wrongly for the example of my photos – This candle will always drip due to its irregular shape.
Important notes:
Always burn the candle on a non flammable surface – Candles can drip especially irregular shaped or novelty candles.
Keep out of the reach of pets and children.
Do not burn on uneven surfaces and keep out of drafts and away from anything flammable.
Never leave a burning candle unattended.
If you have any issues with my candles – please use the contact form to get in touch. I’m always happy to discuss any issues with my customers.